
We're going to show you how to create an e-commerce website using Joomla and Phoca Cart.
All the actions that are described in this article can be seen in the following video:
We will focus not so much on installing Joomla itself and not so much on managing Phoca Cart in administration, but mainly on building the whole e-commerce website, including various modules, etc.
So we will start our tutorial after we have successfully installed Joomla. If you don't know how to install Joomla, then see following link: Install Joomla itself.
If we have Joomla installed correctly, we can get started. We will start with the administration. And before we get into the installation of the main component - Phoca Cart - e-commerce solution for Joomla, we will show you some small extensions that will help us simplify our work in the administration. We start with the Phoca Top Menu module.
Phoca Top Menu module
See YouTube video - Phoca Top Menu module chapter
If you've worked with Joomla before, you'll know in versions before Joomla 4 there was a top menu. This top menu is very beneficial when working on the desktop, allowing you to access different parts of the system faster. After installing the module, we go to Module Manager and publish the module, set its position, in our case "customtop" and select what menu to display. After successful setup, we will see the top menu in Joomla administration, which will allow us to access different parts of the system much faster.
See Phoca Top Menu module website
Phoca Desktop System plugin
See YouTube video - Phoca Desktop System plugin chapter
Another extension is the Phoca Desktop System plugin. This plugin will create a shortcut area directly on the main administration page.
After installing this plugin and publishing it, we need to define shortcuts to different parts of the system. Shortcuts are defined using JSON format and this is so that when admins create a new Joomla page, they don't have to create each shortcut one by one. Administrators save and update the shortcuts in a file and then copy the contents of the file into the options of this plugin. We can also choose a background image for the shortcuts to make the admin work more comfortable.
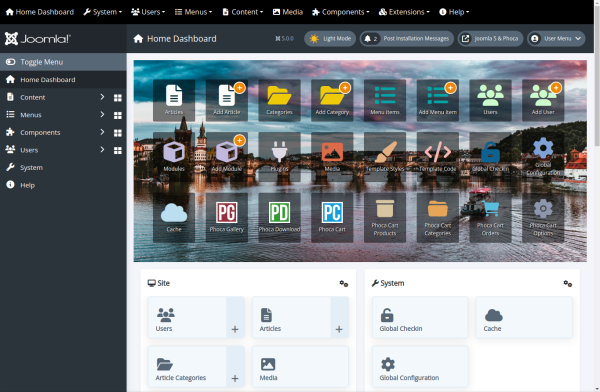
After saving the plugin options, we will get a section on the administration homepage showing the individual shortcuts. An example can be not only a shortcut to list of all articles, but also a shortcut to create a new article. There is no limit to the number or use of shortcuts, and it is up to the administrators to decide what shortcuts to create for their users.
See Phoca Desktop System plugin website
Phoca Filter Options System plugin
See YouTube video - Phoca Filter Options System plugin chapter
A very important part of the system is search and filtering. If an extension has many parameters, then it is difficult to find your way through all of them. Phoca Cart, like any e-commerce extension, contains many parameters and therefore it is beneficial to be able to filter these parameters easily.
For this we use the Phoca Filter Options System plugin.
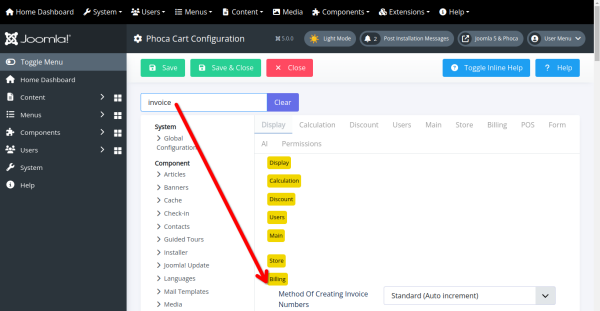
After installing and publishing this plugin, we will see a filter box in the system settings or in the settings of each extension. Using this filter box, we can quickly find the parameter we need.
See Phoca Filter Options System plugin website
Phoca Commander
See YouTube video - Phoca Filter Commander chapter
Sometimes we need to manage or edit folders and files on our website.
An example would be uploading user.css to the template folder. If user.css doesn't mean anything to you, you should know that Joomla has a great system of overriding both HTML output and CSS classes. With overrides you can customize design of your own page and you won't lose changes when you update the system. Because those files are stored in places that the update does not overwrite. We're talking about template overrides, see more information about Joomla template overrides feature.
The component that allows us to upload our own files to the system and edit them is called Phoca Commander. Phoca Commander is dual panel file manager for Joomla.
As an example we will use uploading a custom style for the administration template and modifying it.
As you can see, using a custom style we have changed the design of the administration template. Such changes are stored in the template folder, overwrite the standard template design, and are not lost on update. And all this is used both in the administration and in the frontend.
Phoca Commander helps us in all this, and of course it has many other features for working with folders and files.
Phoca Cart
See YouTube video - Phoca Cart chapter
And now we come to the main extension of our website - Phoca Cart.
First, we will install the basic Phoca Cart package, which includes the main component, basic payment and shipping plugins.
Then we install the demo data and finally the package of ten core modules.
So we'll start with the main package. After installing the main package, a wizard will pop up and give us information on what all we should do to make our site a working e-commerce website.
Before we start filling in the different parts, we will install the demo data. The demo data will create our categories, products, shipping and payment methods.
Phoca Cart demo data
See YouTube video - Phoca Cart demo data chapter
After installing the demo data, we go back to the main component and run the wizard so we know what parts we still need to add.
The demo data installation package has created categories and products for us. In our example, we will not use taxes, so we will leave taxes blank.
The demo data package also created our shipping and payment methods. If we want our system to contain all the world countries and regions, then we import the countries and regions. If we don't want that, we fill in our own countries and regions.
Menu link to Phoca Cart
See YouTube video - Menu link to Phoca Cart chapter
Each part of the system needs a menu link to take users to that part. And it's no different with e-commerce extensions. Even our shop needs its own menu link. That's why we go to Joomla menu manager and create one menu link there. It is recommended to always create one link so that the SEF links are uniform. In our case, we will create a menu link to Phoca Cart categories view, which is the default link.
This will be our main link to our shop displayed on our frontend website.
Phoca Cart main modules package
See YouTube video - Phoca Cart main modules package chapter
Each Joomla page includes modules. The most famous is probably the module for displaying menu links. Think of a module as part of a page. For an e-commerce website, we will want to display other parts besides the menu such as cart, wish list, comparison list, currency list or search and filter module.
Phoca Cart has prepared a package of modules, which contains ten of the most important modules. These can all be easily installed at once.
So, we will install the modules for now and in the next chapters we will introduce some of them in detail and show them on the website.
Download Phoca Cart main module package
Phoca Cart main modules setting
See YouTube video - Phoca Cart main modules setting chapter
Let's introduce some basic modules for an e-commerce website.
Phoca Cart Search module
Let's start with the Phoca Cart Search module. This is a search module. It displays a search form on the website where users can search for individual products. The search module works closely with the filter module, which can be used to filter individual parameters and display products based on custom requirements.
Phoca Cart Cart module
One of the most important modules is the Phoca Cart Cart module. This module displays all products that the user has added to the shopping cart. No matter what page the user is on, the shopping cart module should always be accessible so that users can check which products they have ordered.
Phoca Cart Compare module
If the user is not sure and is deciding between two similar products, they have the option to compare these products. For example, by parameters, attributes or specifications. The Phoca Cart Compare module displays a list of all the products the user has added for comparison.
Phoca Cart Currency module
If your shop allows users to pay in multiple currencies, be sure to display the Phoca Cart Currency module, which lists all available currencies for that particular shop. Users can then choose the currency they want to use when paying.
Phoca Cart Wish List module
Some users don't buy products right away, but still want to indicate that they are interested in a particular product. For this purpose, there is the Phoca Cart Wish List module, which allows users to create a list of products they would like to purchase.
So we have published all the modules and set their positions for display. The modules are now displayed on the website and ready to use.
Phoca Cart Toys Cassiopeia Child template
See YouTube video - Phoca Cart Toys Cassiopei Child template chapter
OK, but if we look at the page, we can see that those individual modules take up a lot of space on the page. For example, a filtering module would be better suited in their place. It's just not OK.
Something needs to be done about the design. We haven't even described what types of products we're going to offer yet. So let's fix that and reveal that we're dedicating this entire demo site to selling toys.
For our example, we're going to use the Cassiopeia Child template. We will install the Phoca Cart Toys Cassiopeia Child Template.
Download Phoca Cart Cassiopeai Child templates
Moving Phoca Cart main modules to top postion
See YouTube video - Moving Phoca Cart main modules to top postion chapter
After installing this template, we go to the template styles settings in Joomla and mark the template we installed as default.
In our case we will not use the logo position that is set in the template, but we will create our own module for the logo. This will give us more freedom in displaying the logo.
So we will create a new module - the type will be "custom". We'll set this module to the "topbar" position and insert the custom HTML with the logo.
On the page we will want to display the menu links right next to the logo. Therefore, we will modify the existing module for menu items and set it to "topbar" position as well.
In this one line, where the logo and menu are displayed, we will also want to display our selected modules. But beware, we will not want to display the contents of these modules, but only links to these contents in the form of icons. This is where Joomla's great feature - template overrides - will help us. Our child template contains template overrides for the following modules:
- Phoca Cart Search module
- Phoca Cart Cart module
- Phoca Cart Wish List module
- Phoca Cart Compare module
- Phoca Cart Currency module
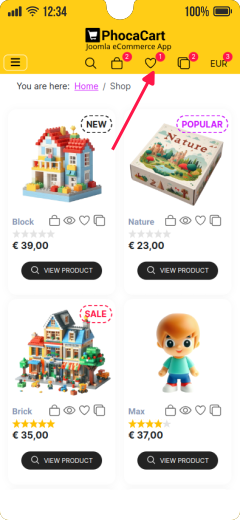
We will set all these modules to "topbar" position, and publish them all. We will set them not to display the title and to be displayed on all pages.
We have now freed up space on the right side of the website, but the login module is still there. We will move it to the left side and add the Phoca Cart Filter module to it. So that users can filter individual parameters and display products according to selected criteria.
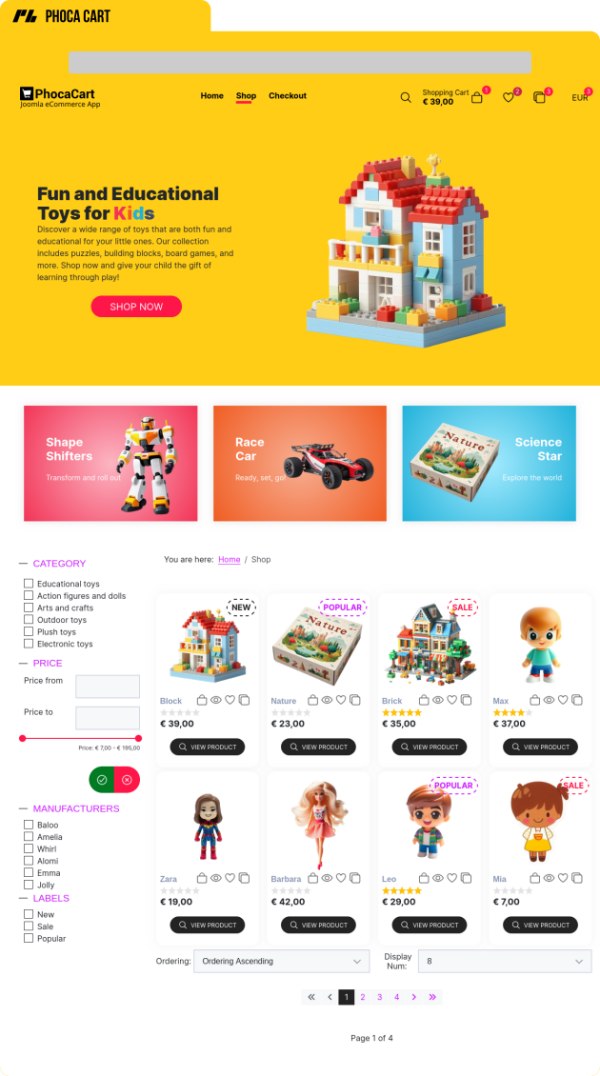
So now our site is divided into three parts. The top part contains: logo, menu and various Phoca Cart modules. The left side contains the login module and the filter module. The right one contains the main part of the page - for example categories or product list.
Phoca Cart Particles module - Image and Content type - module in top position
See YouTube video - Phoca Cart Particles module - Image and Content type - module in top position chapter
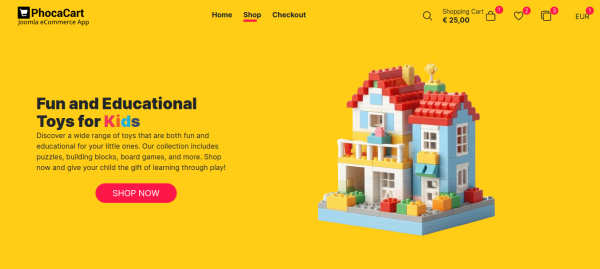
Any website that deals with selling goods or services should include some banners that invite customers to buy.
Let's create such a banner in the header of the page. Let's use Phoca Cart Particles Module to create it.
Phoca Cart Particles module is basically the opposite of page builders. First we don't deal with the design, but with the data. So we first enter the data we want to display and then select the appropriate design. The advantage is that we can change the design simply by switching to a different output style.
In our banner we will want to display some title, description and image. But we will also want to display a "Shop now" button.
We chose the "Image and content" type. This type does not contain individual items and therefore all its settings will be done in the "Main" tab.
So first we will insert a title.
Next, we select an image. We will use one image from existing products.
We will also create a "Shop now" button and use the product list page as a link for this button.
Finally, we'll insert some description. This can of course be formatted using HTML.
We save everything and we can see our newly created banner in the frontend.
See Phoca Particles module website
Phoca Cart Product module
See YouTube video - Phoca Cart Product module chapter
We have finished the top part of our site - logo, menu, various Phoca Cart modules. We have also finished the left part of the page, where we display the filter and login. But let's use other Phoca Cart modules as well.
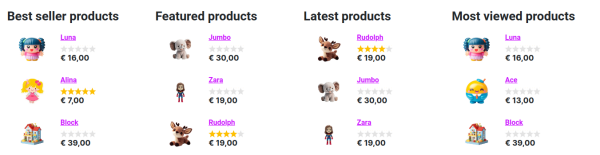
One of them is the Phoca Cart Product module. We're going to use this module four times directly at the bottom of our page. We'll create four different instances of this module and display the following statistical information:
- Best seller products
- Featured products
- Latest products
- Most viewed products.
Best seller products
So let's start with Best seller products. As with all modules, we set whether to display the title or not. We set the position of this module, in this case it is the "bottom-a" position. We choose the correct ordering and number of items to display. We also don't forget to display this module on all pages. We also set the layout as a list.
Featured products
The second module will be featured products. Since we saved the previous module as a copy, we don't need to set all the parameters as in the first module. Only the ones that are different.
Latest products
This is how we proceed to the next module, which is called Latest products. As you can see, again we are only changing the parameters that have changed. In this case, we just publish the module and change ordering of the items to match the meaning of the module.
Most viewed products
The last module in this series will be Most viewed products. Again, we'll just publish it and change the ordering.
Once we have all four modules created, we'll display a list of them in our administration so that we can sort them to our liking.
So we'll do the ordering and the result can be seen in the frontend. The data in these modules is displayed automatically. There is no need to fill them, they are automatically created according to the statistical data from our shop.
See Phoca Cart Product module website
Phoca Cart Particles module - Image and Feature Box - module in bottom position
See YouTube video - Phoca Cart Particles module - Image and Feature Box type - module in bottom position chapter
At the top of the page we have a banner with a title, a description and a picture. Also a button with a link leading to the list of products.
Let's create a similar banner in the footer of the page. We'll use the same module for this - Phoca Particles module. The only difference is that now we will want to list more items - specifically the names of the items and their short description. Then some product image next to it.
So we'll start by creating a new instance of the Phoca Particles module. Again, we'll set the title, make it public, and select the module type. In this case, the type will be "Image and Feature Box".
In the "Main" tab, we will select one main product image to represent the entire module.
After that, we'll go to the "Items" tab and fill in all the items. In our case we will create four items. Each item will contain a title, an image and a short description.
We follow the same procedure for each item until we fill in the data for the last item.
We will save everything. We can add a button and link again to the list of items.
We have saved the data and we can change the design of the resulting module at any time. We will only need to change some parameters to do this without having to modify the data.
See Phoca Particles module website
Phoca Cart Brands module
See YouTube video - Phoca Cart Brands module chapter
One of the other Phoca Cart modules for which we don't have to fill in any data, and which displays data directly from Phoca Cart, is the Phoca Cart Brands module.
Phoca Cart Brands module will show us a slideshow of different brands of products from our shop.
We set up the module in the same way as all other modules. We set the title, publish, set the position, or set other parameters.
In the list of modules, we then reassign the module to the position where we want to display it.
After that, we will see a slideshow in the frontend of the brands of the products we sell in the shop.

See Phoca Cart Brands module website
Phoca Cart Particles module - Feature Box - module in bottom position
See YouTube video - Phoca Cart Particles module - Feature Box type - module in bottom position chapter
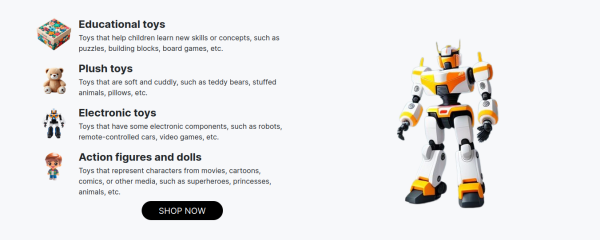
Now we will show one last use of the Phoca Particles module.
Let's say we want to give customers information about our services, that we have "fast and free delivery", we also have "online customer support", we provide "money back guarantee" and payment with us is secured.
We'll want to display these four pieces of information in four boxes, which will include a title and description, plus an SVG icon representing the service.
We already know the Phoca Particles module. So the setup will be plain. We will set the position, publish the module and select the module type. In this case it will be the "Feature Box" type.
We won't set anything in the "Main" tab, but we'll directly set four items in the "Items" tab. Each item will contain a title, an SVG icon and a description.
Once we set the items, we can save the modules. We can then change the ordering of the modules in the module list and can already see the result in the frontend.

See Phoca Particles module website
Phoca Email Newsletter module - in footer position
See YouTube video - Phoca Email Newsletter module - in footer position chapter
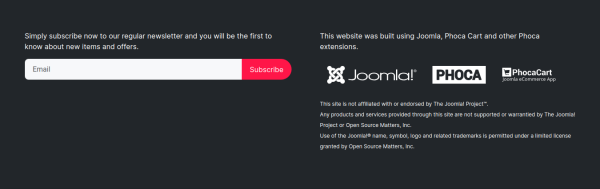
Now our page is missing only the footer.
The footer usually displays contact information and so on. We will display the newsletter module here for an example.
So we will install the Phoca Email Newsletter module, which is part of the Phoca Email component. So we'll also install the Phoca Email component.
The Phoca Email component allows us to send emails directly from the Joomla administration, but it also allows us to create and manage different newsletters and send them to users. The Phoca Email component works together with the Phoca Cart. For example, it is possible for a user to sign up for newsletters directly when creating an order.
We can already set up modules, so we publish the module and set its position in the footer.
In addition to the newsletter module, we will add a custom module with information about our site to the footer.
We change the ordering of both modules and then we can see these modules in the footer of our page.
See Phoca Email website
See Phoca Email Newsletter module website
Phoca Open Graph System plugin
See YouTube video - Phoca Open Graph System plugin chapter
Let's introduce one more plugin that is significant with respect to SEO. It's actually a group of two plugins: the Phoca Open Graph content plugin, which is used for articles, and the Phoca Open Graph system plugin, which is used for the rest of the website.
In our case, we'll use the Phoca Open Graph system plugin, which works with Phoca Cart.
Phoca Open Graph System plugin adds open graph information to the website. The open graph data that is displayed as meta tags then allows you to display information from that web page, for example, on social networks. If we link to our page on social networks, this link is displayed together with the page title, an image and a short description.
So we set up this plugin, we publish it. Then we make sure that the product for which we want to display open graph information contains a description in addition to the title and image.
We then navigate to the product on our website, copy its URL, and paste it into a test application that will show us how the link will appear for example on social media.
Displaying meta tags with open graph information is one of the basic tasks if we want to share links to our products.
See Phoca Open Graph System plugin website
See Phoca Open Graph Content plugin website
Phoca Cart - Checkout
See YouTube video - Phoca Cart - Checkout chapter
And we're coming to the end. Let's finally show the checkout procedure.
Checkout is done by the user who logs in. Guest checkout is also possible in Phoca Cart. After logging in, the customer enters the address information and selects the shipping and payment method. The customer then confirms the order.
Phoca Cart Shipping Packeta plugin
Some shipping and payment methods were created for us when we installed the demo data. Let's look at one of the shipping method plugins. Phoca Cart Shipping Packeta plugin (Phoca Cart Shipping Zásilkovna plugin). This plugin integrates the services of Packeta (Zásilkovna), a company that operates parcel services mainly in Central Europe.
So we install the plugin and check if our shipping method has this plugin selected.
See Phoca Cart Shipping Packeta plugin website
Phoca PDF component and the Phoca PDF Phoca Cart plugin
We will do the same for the payment methods. For example, for the payment method "bank transfer" we will want to show the customer a QR code with the payment details.
To display the QR code in Phoca Cart, we will install the Phoca PDF component and the Phoca PDF Phoca Cart plugin. This component and plugin will allow us to display the QR code. In addition to the QR code, this component and plugin will take care of creating PDF documents such as invoices or even printing product catalogues.
Phoca PDF Phoca Cart plugin needs to be published.
See Phoca PDF website
See Phoca PDF Phoca Cart plugin website
Checkout
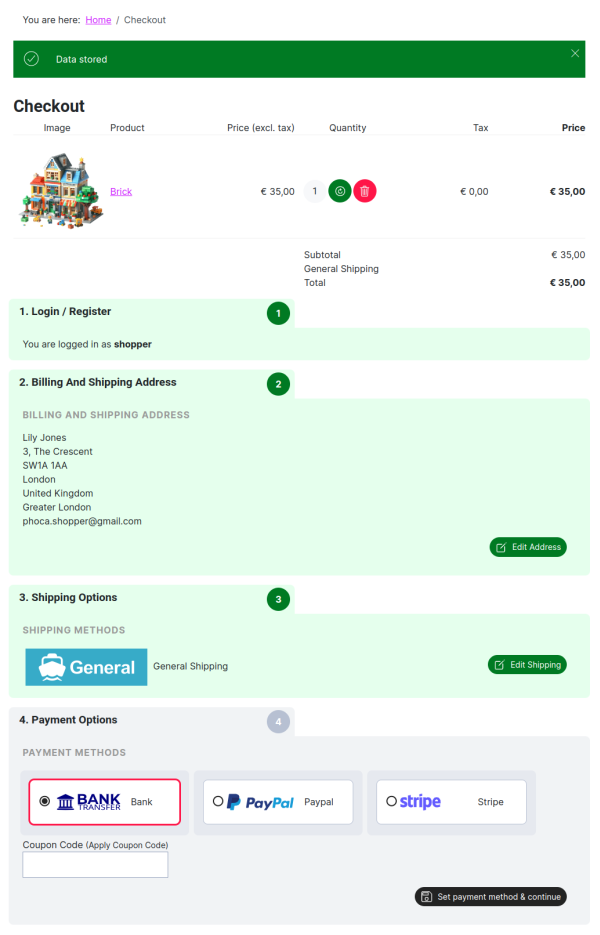
Let's move on to the checkout itself. First we select a product and add it to the shopping cart. Then we go to the checkout page.
This is where the customer logs in and enters the details required for delivery of the goods. The fields in the address section of the form can of course be set up and custom fields can be supplied.
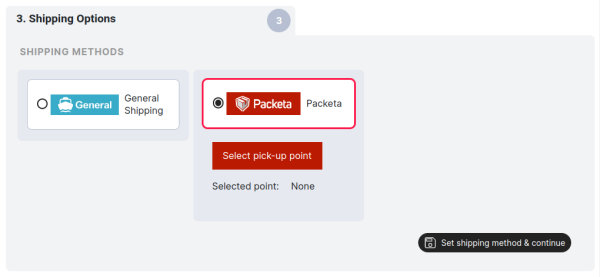
Once the customer has saved address details, they proceed to select a shipping method. Here we show the implementation of the external service widget. Here the customer uses a map to select the branch of the shipping location.
The customer saves the selection of the shipping method, followed by the selection of the payment method. Here the customer selects, for example, the bank transfer method, saves it and continues.
The only thing left to do is to agree to the terms and conditions and confirm the order.
As the customer has selected the payment method "bank transfer", a QR code with the payment details will be displayed at the end of the order process. This QR code will of course be sent to the customer in an email and in PDF documents such as invoices.
The merchant sees this order immediately in the order list in administration. The merchant can click on the order to view the order details. Directly in the order list, the merchant can change the order status or view more detailed information about shipping and payment methods.
In our example, the merchant can see the shipping method information. This information can then be exported to an external service to prepare the order for shipping.
Conclusion
In this article we have described some tips and basic features of Phoca Cart. Phoca Cart, like Joomla, contains a large number of extensions and therefore the possibilities when creating an e-commerce site are essentially unlimited. If you are interested in learning more, please visit phoca.cz/phocacart.