- Files: in case Phoca Gallery these are images and thumbnails, in case Phoca Download these are all downloadable files (preview and play files)
- Data in database: all information about Phoca Gallery images and Phoca Download files stored in database.
To export/import files you will need FTP manager (or in Joomla! 3, you can use Phoca Commander - file manager)
To export/import data you will need phpMyAdmin application (runs on most webhosting servers).
Joomla! 2.5 (exporting site)
- Phoca Gallery: 3.2.8
- Phoca Download: 2.1.9.
Exporting files (Joomla! 2.5)
Phoca Gallery:
[images/phocagallery] folder
Phoca Download:
[images/phocadownload] folder
[phocadownload] folder - in case you are using your own folder for Phoca Download files, then just copy your folder.
Exporting data (Joomla! 2.5)
Login to your phpMyAdmin application, select database where all data of your Joomla! 2.5 site are stored.
In Output settings select: Set output to a file (to store the SQL queries in file).
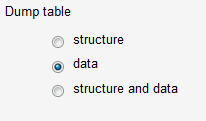
In Dump table option set data (only data will be backed up, not table structure - this is important as in Joomla! 3 new columns were added. Such columns will be automatically added during installation and they will be not in conflict with exported data).
Save the backup (SQL queries) as e.g. phocagallery.sql (phocadownload.sql). Now all Phoca Gallery or Phoca Download data of old Joomla! 2.5 site are backed up.
Joomla! 3.x (importing site)
Be sure you have installed the latest Phoca Gallery (Phoca Download) version on your Joomla! 3 site. If not, just upgrade to latest version:
- Phoca Gallery: 4.3.10 (the latest version when this guide was written)
- Phoca Download: 3.9.1 (the latest version when this guide was written).
If you get for example this error: Table '#__phocagallery_styles' doesn't exist, this mostly means that the newest version was not installed.
Importing files (Joomla! 3)
Phoca Gallery:
[images/phocagallery] folder
Phoca Download:
[images/phocadownload] folder
[phocadownload] folder - in case you have set your own folder for Phoca Download files, then just copy your folder.
Now Phoca Gallery (Phoca Download) should include all images (files) from your old Joomla! site.
Importing data (Joomla! 3)
Example - if the prefixes are different (jos25 or jos35 are only examples):
Joomla! 2.5 used for example jos25_ prefix
Joomla! 3 will use for example jos35_ prefix
After backup and before importing SQL queries you need to replace all jos25_ strings to jos35_ strings in stored backup file. Just open the phocagallery.sql or phocadownload.sql file and replace the prefix by the table names.
TRUNCATE TABLE `jos_phocadownload_layout`;

Select file with backup from your disc (phocagallery.sql or phocadownload.sql).
Phoca Maps Migration
- jos_phocamaps_map
- jos_phocamaps_marker
- jos_phocamaps_icon
Files from following folder should be copied:
[phocamapskml] folder
Phoca Restaurant Menu Migration
- jos_phocamenu_config
- jos_phocamenu_day
- jos_phocamenu_email
- jos_phocamenu_group
- jos_phocamenu_item
- jos_phocamenu_list
There are no files to be copied.
Phoca Guestbook Migration
- jos_ (this can be different to yours, so just change jos_ to your own prefix: yourprefix_)
- jos_temp_ (the same here, change jos_ to your own prefix: yourprefix_temp_)
2) Export only items table, there are two tables in Phoca Guestbook (Joomla! 2.5):
- jos_phocaguestbook_books (do not export)
- jos_phocaguestbook_items (export)
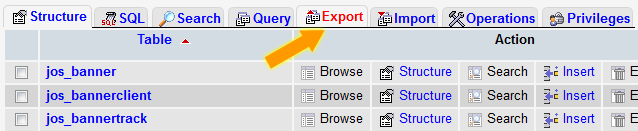
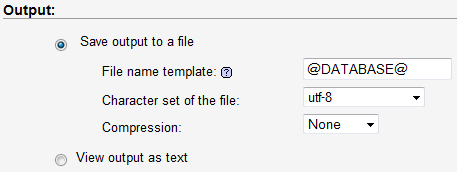
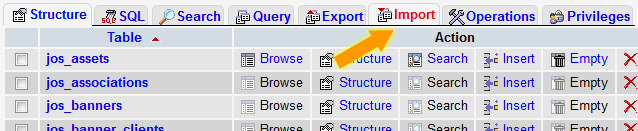
Go to your phpMyAdmin, to your Joomla! 2.5 database, click on Export (see screenshots above to locate the parts which are described here):
- Export Method: Custom
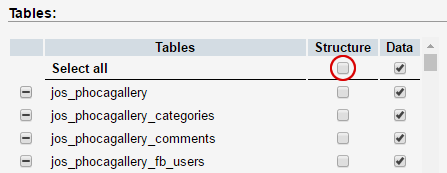
- Tables: select only one table - jos_phocaguestbook_items
- Output: Save output to a file
- Format: SQL
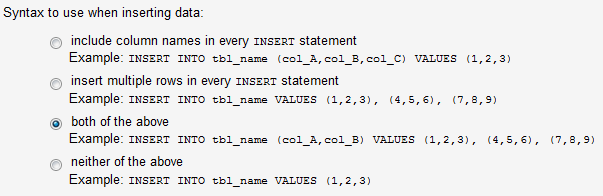
- Format-specific options: structure and data
- Data dump options: both of the above
and click Go to store (backup) file with guestbook items. Now you have exported (made backup) guestbook items. For example, its name is phocaguestbook-items.sql
4) Open this file (phocaguestbook-items.sql) and edit it, change jos_ prefix to jos_temp_ prefix (use own prefix, it is important to use the temp string there), for example:
FROM:
CREATE TABLE IF NOT EXISTS `jos_phocaguestbook_items` ( ...
INSERT INTO `jos_phocaguestbook_items` ( ...
TO:
CREATE TABLE IF NOT EXISTS `jos_temp_phocaguestbook_items` ( ...
INSERT INTO `jos_temp_phocaguestbook_items` ( ...
3) Go to administration of your new site (Joomla! 3) and install Phoca Guestbook 3 (in our case 3.0.2)
4) Create new guestbook in Joomla! 3. When you save the guestbook, you can see list of guestbooks - there you can see ID of your guestbook. Remember or note this ID.

5) Go to phpMyAdmin, to your Joomla! 3 database, click on Import (see screenshots above to locate the parts which are described here):
- File to Import: browse and select phocaguestbook-items.sql
- Click on Go
Items will be imported to your Joomla! 3 database - to temporary table (jos_temp_phocaguestbook_items). Now, in your Joomla! 3 database, there are two tables with items:
- jos_phocaugestbook_items (made by installation of Phoca Guestbook 3, should include only one default row)
- jos_temp_phocaguestbook_items (made by the import)
6) Run following SQL query in phpMyAdmin, in your Joomla! 3 database (be sure, you have set your prefix right):
INSERT INTO `jos_phocaguestbook_items` (id, catid, parent_id, lft, level, username, userid, email, homesite, ip, title, content, date, published, checked_out, checked_out_time) SELECT id+1 AS id, 10013 AS catid, 1 AS parent_id, ordering AS lft, 1 AS level, username, userid, email, homesite, ip, title, content, date, published, checked_out, checked_out_time FROM `jos_temp_phocaguestbook_items`
7) Update the language:
UPDATE `jos_phocaguestbook_items` SET `language` = '*';
8) Update category ID (set the ID which you have noted as guestbook ID):
UPDATE `jos_phocaguestbook_items` SET `catid` = '8';
UPDATE `jos_phocaguestbook_items` SET `catid` = '0' WHERE `id` = '1';
Now, items are imported but we need to set the right ordering, run the following SQL queries:
CREATE TABLE migrate AS
SELECT id,
 @rowid:=@rowid+2 AS rowid,
 @rowid - 1 AS lftnew,
 @rowid AS rgtnew FROM jos_phocaguestbook_items,
 (SELECT @rowid:=0) AS init
ORDER BY id;

UPDATE jos_phocaguestbook_items SET lft=(SELECT lftnew FROM migrate WHERE migrate.id = jos_phocaguestbook_items.id);
UPDATE jos_phocaguestbook_items SET rgt=(SELECT rgtnew FROM migrate WHERE migrate.id = jos_phocaguestbook_items.id);
9) Migration done, now remove temporary tables:
DROP TABLE `jos_temp_phocaguestbook_items`, `migrate`;